If you find that extensions cannot log in to the admin page after upgrading the 3CX server from V18 to V20:
Scenario 1: All extensions do not have system owner permission. After logging into the web page, the bottom left corner does not display admin. It is later found that no extension has system owner permissions. In this case, the old V18 server has also been deleted, making it impossible to generate a new backup file after modifying the extension configuration on the old V18 server. Additionally, it is also not feasible to restore a V18 backup on a newly installed V18 server for modification (because the license has been upgraded to V20 and cannot be installed in the V18 environment).
Scenario 2: The extension email address of the system owner is not unique and the login password has been forgotten. After upgrading to V20, you need to use an extension with system owner permissions to log in to management, rather than the V18 administrator account. However, you have forgotten the login password of the system owner extension, and the email address is not unique, so that clicking forgot password on the web page cannot send you the password reset email. Similarly, the V18 server has also been deleted.
Based on the above situations, you can try modifying the V18 backup file through the following method, and then restore it in the V20 environment using commands, thereby logging into the V20 management page.
Prerequisites:
You need to install two tools on your computer in advance: 7zip and notepad–.
Steps:
1.Use 7zip to open the V18 backup file:
Run 7zip as administrator, and click the backup file:

2.Set the default editor for 7zip to notepad–:
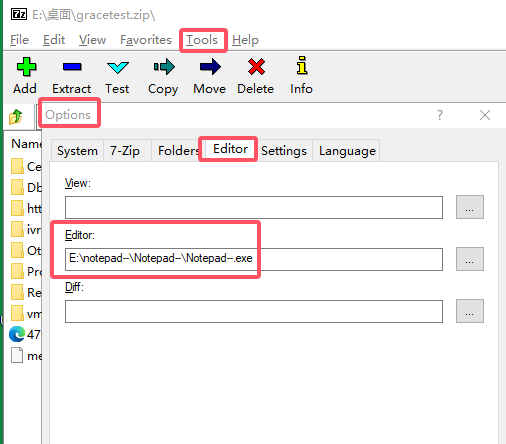
You need to input the directory where Notepad–.exe is located, then click Apply or OK to save the settings.
3.Use notepad– to open and edit the xml file:
Right-click the xml file, click Edit, and the file will automatically open in notepad–.

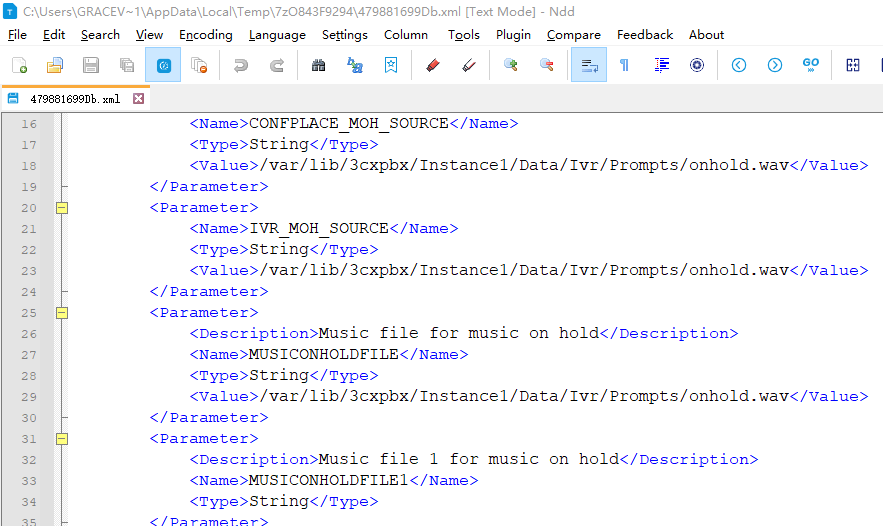
Next, you can modify the corresponding content in notepad–, such as changing the extension permissions to system owner or modifying the extension’s email address. If you are not familiar with or are unsure about the content to be modified, we suggest contacting us for modification.
4.Save the edited xml file:
After modification, click File in the upper left corner of notepad– -> Save, then close notepad–.
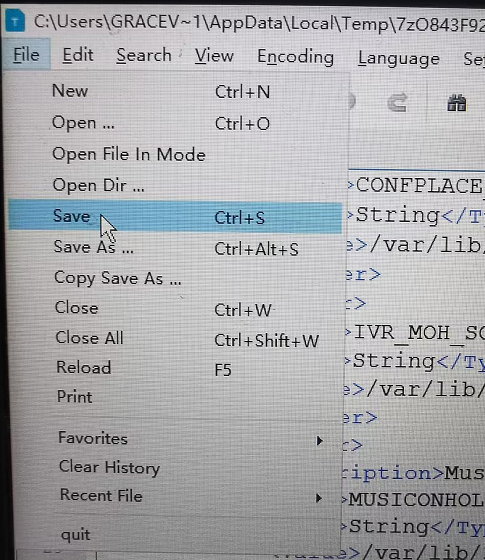
Return to 7zip, which will prompt whether to update the archive. Click Yes.

The backup file is now modified.
5.Upload the modified backup file to the V20 backup directory:
In our test environment, the default directory is /var/lib/3cxpbx/Instance1/Data/Backups, and we use FileZillaClient to upload the file to this directory.
6.Restore the backup file’s configuration to V20:
SSH to the V20, and use the command to restore:
sudo -u phonesystem 3CXRestoreCmd –file=gractest.zip –log=restore_cmd.log
For detailed information of backup and restore command, you can refer to the file here.

