SIP Gateway lets your organization use any compatible SIP device with Microsoft Teams to preserve your investments in SIP devices. Now you can sign-in to Teams with your corporate credentials and make and receive calls with a compatible SIP device. Compatible devices can be Skype for Business IP phones with standard SIP firmware, Cisco IP phones with multiplatform SIP firmware, or SIP devices from vendors such as Poly, Yealink, and AudioCodes. To find out how to configure your SIP devices for SIP Gateway, see Configure SIP Gateway.
Let’s take AudioCodes 440HD as an example to introduce how to register AudioCodes phones as SIP devices for Microsoft Teams.
Restore the phone to default settings
If this phone not restore to default, please follow below steps:
- On the phone, open the Restore Defaults screen (MENU key > Administration > Restore Defaults)
- Press the Select softkey; a warning message appears requesting you to confirm.
- Press the Yes softkey to confirm reset to defaults or No to cancel.
Verify that SIP Gateway is available for your organization
- Sign in to the Teams admin center.
- At the left, select Teams devices and see if the SIP devices tab is visible. If it is, the SIP Gateway service is enabled for your organization.
Enable SIP Gateway for the users in your organization
You can enable SIP Gateway for your organization in either of two ways: by using the Teams admin center, or by using a PowerShell cmdlet.
By using Teams admin center
To enable SIP Gateway in the Teams admin center, follow these steps:
- Go to the Teams admin center
- At the left, under Voice, select Calling policies.
- At the right under Manage policies, select the appropriate calling policy assigned to users or, if necessary, create a new calling policy and assign it to the required users.
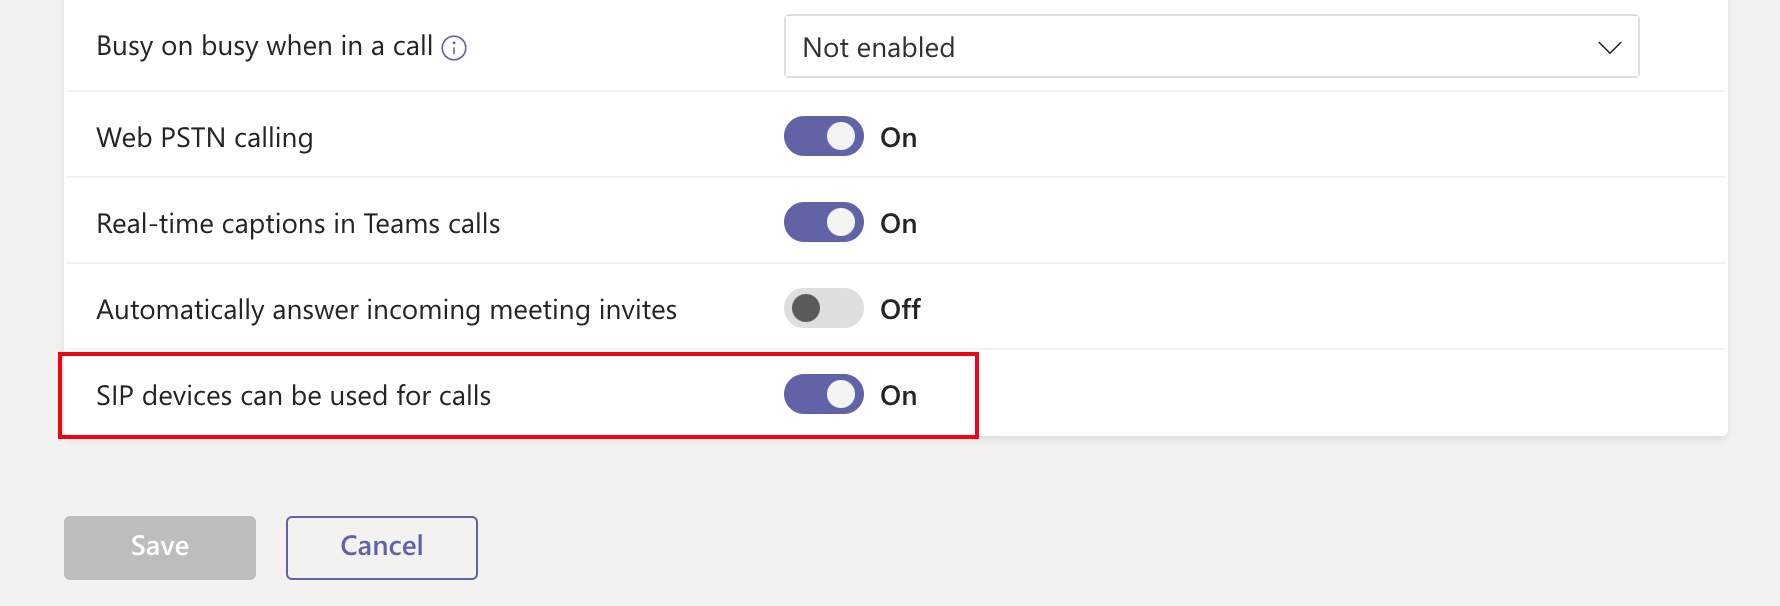
- Select Manage policies, select a policy, and then select Edit.
- Turn on the setting for SIP devices can be used for calls, and then select Save.
By using PowerShell
You can also enable SIP Gateway by using the PowerShell Set-CsTeamsCallingPolicy cmdlet. To enable users for SIP devices, select a policy, and set the -AllowSIPDevicesCalling attribute to True. The default value is False, so users will not be able to use their SIP devices unless you enable them.
⚠️Note: Policy propagation may take up to 24 hours.
Set the SIP Gateway provisioning server URL
You can set the SIP Gateway provisioning server’s URL in your Dynamic Host Configuration Protocol (DHCP) server. Users who work remotely must configure it manually.
Open IP phone’s web interface, Go to Management -> Automatic Update -> Automatic Provisioning, put following SIP Gateway provisioning server URLs to Configuration URL section.
- EMEA:
http://emea.ipp.sdg.teams.microsoft.com - Americas:
http://noam.ipp.sdg.teams.microsoft.com - APAC:
http://apac.ipp.sdg.teams.microsoft.com
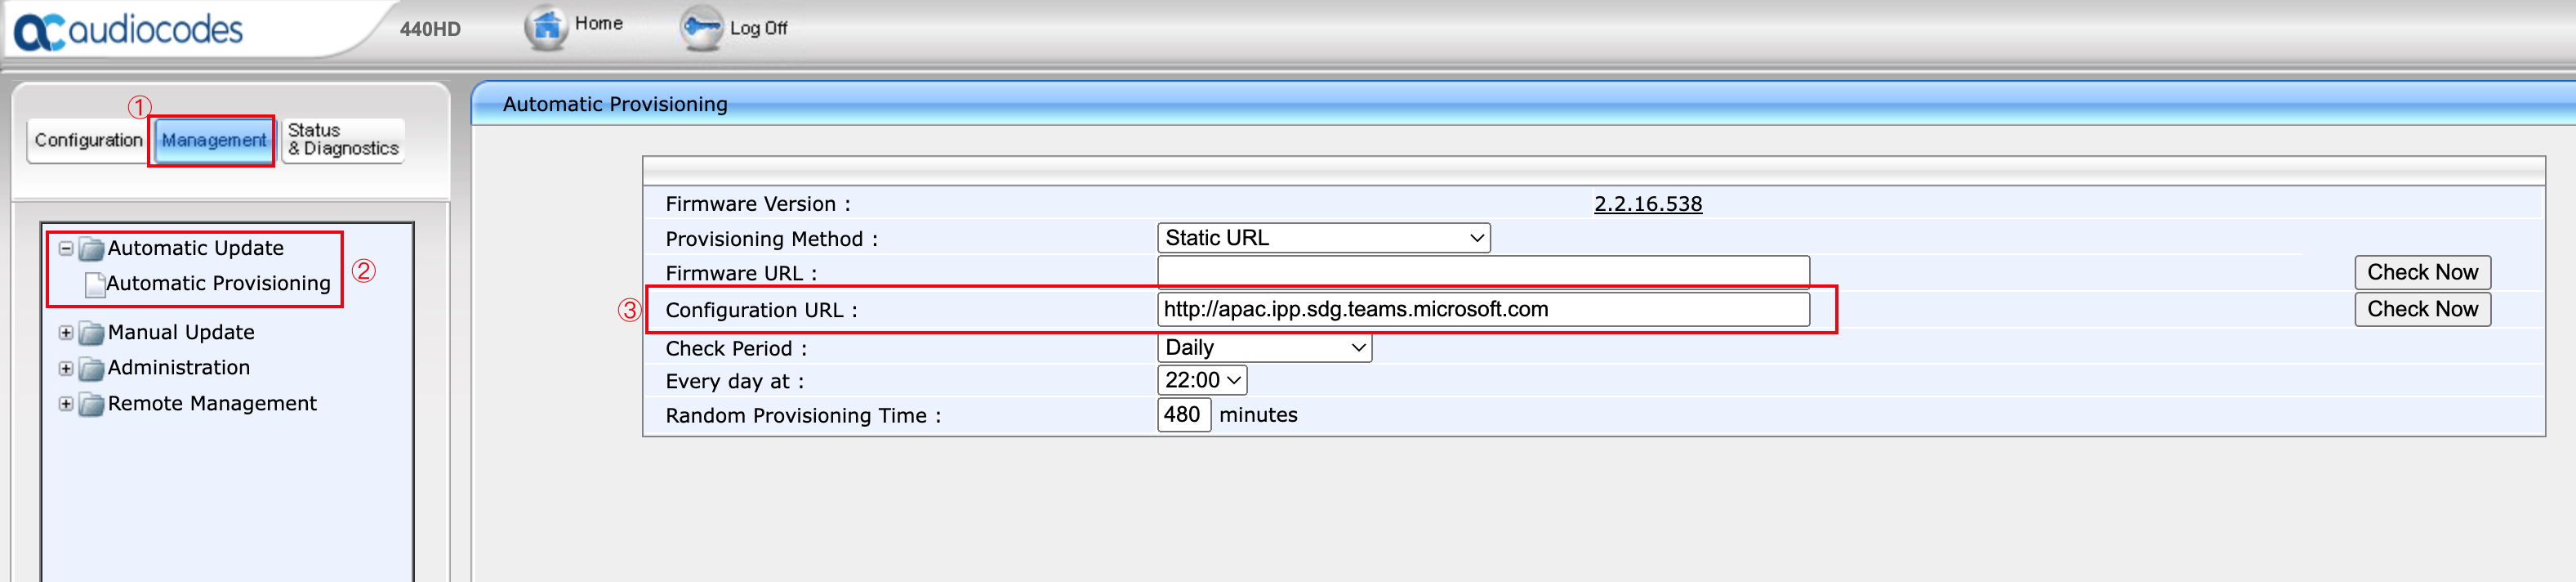
Click Check Now button, IP phone will download configuration file and reboot. After all, this page will like below:

In phone screen will like this:

Provision and enroll SIP devices as common area phones
To streamline your tasks, you can enroll SIP devices in the Teams admin center either one at a time or in batches. Here’s how:
- Log in to the Teams admin center.
- Select Teams devices > SIP devices.
- At the upper right, select Actions > Provision devices and follow one of these steps:
- To provision one device:a. Under Waiting on activation, select Add.b. On the Add MAC addresses pane, enter the MAC address and Location of the device, and then select Apply.
c. Under Waiting on activation, select the device you just added, and then select Generate verification code.
d. On the Provision devices pane, under Verification code, note the verification code for the SIP device.
- To provision many devices:a. Under Waiting on activation, at the right, select Export (the Microsoft Excel icon).b. On the Provision devices pane, under Upload multiple MAC addresses, select download a template.
c. Save Template_Provisioning.csv to your computer and fill in the MAC id and Location fields.
d. On the Provision devices pane, select Upload multiple MAC addresses.
e. At the right on the Upload MAC addresses pane, select Select a file, and select the Template_Provisioning.csv file that contains your data.
f. On the Provision devices pane, under Waiting on activation, select a device and then select Generate verification code to generate a one-time verification code for each provisioned device. Note the verification code for each SIP device.
- On the SIP device, dial the enrollment feature code followed by the verification code. On the SIP device, dial the enrollment feature code 55 (used by SIP Gateway for enrollment one-time-verification code validation), followed by the verification code that is generated in Teams Admin Center for this particular device. For example, if the verification code is 123456, dial 55123456 to enroll the device.
- On the Provision devices pane, under Waiting for sign in, select Signed out.
- In the Sign in a user dialog, copy or note the SIP device’s pairing code.
- Go to https://microsoft.com/devicelogin, and under Enter code, enter the SIP device’s pairing code, and then select Next.
- On the Microsoft Sign in page, in the Email or phone field, enter the email address for the SIP device, and then select Next.
- On the Password page, enter the password for the email address for the SIP device, and then select Sign in.
- On the Are you trying to sign in to Teams SIP devices gateway page, select Continue.